
Profos-Systems Communications Lab

Custom Network Traffic Analysis⌗
Please do not interact with any IP addresses found inside of this lab! These IP addresses do not belong to me, they are used in an isolated lab, no IP addresses in this lab have any significance!
Purpose⌗
The purpose of this lab is to give students experience dissecting custom networking protocols. Although this can seem like an obscure problem to run into, this is still important, mainly in the realm of learning how packets are structured, or IoT device communication. This lab will take students through data types, sizes, reading offsets, and reading/understanding a protocol specification.
Background⌗
Analysis of a Custom Networking Protocol⌗
In order to analyze any protocol, you need to have a few pieces of information. Oftentimes, this required information is noted by a protocol analyzer. However, we are more than capable of finding this information ourselves! The first piece of information we should note is, what is the endianness of our data, also known as the byte order? Which layer does this protocol reside at? Once we have this information we can ask, what protocols are beneath this protocol? Finally, which protocols are above this protocol? Ultimately, we are looking at the whole protocol stack from layer 1 to layer 7 of the OSI model:
Application (Layer 7)
Presentation (Layer 6)
Session (Layer 5)
Transport (Layer 4)
Network (Layer 3)
Data Link (Layer 2)
Physical (Layer 1)
For the most part in protocol analysis we can view layers 5-7 as the same layer, we will just view these as the application layer:
Application (Layer 5-7)
Transport (Layer 4)
Network (Layer 3)
Data-Link (Layer 2)
Physical (Layer 1)
The protocols used at each layer of the OSI model are put together using what is called encapsulation–at every layer of the OSI model each previous layer is put inside a container of the following layer. I will display this with an illustration:
                                                            Application Layer (Data)
                                                                       ...
                                             [Transport Layer Header][Data][Transport Layer Trailer]
                                                                       ...
                        [Network Layer Header][Transport Layer Header][Data][Transport Layer Trailer][Network Layer Trailer]
                                                                       ...
[Data Link Layer Header][Network Layer Header][Transport Layer Header][Data][Transport Layer Trailer][Network Layer Trailer][Data Link Layer Trailer]
                                                                       ...
                                                                Sent Down The Wire
With this information, hopefully now you can see why the four questions we are asking will be so important!
Endianness/Byte Order:
Big-Endian: In this format, our most significant byte is displayed first. For example, the integer 2487 represented in big endian would be 0x000009B7.
Little-Endian: In this format our least significant byte is displayed first. For example the integer 2487 represented in little endian would be 0xB7090000.
Which layer does the protocol reside at? This question will significantly affect what we would expect to see within the protocol’s data as well as the methods used to capture the data. The following list will layout how the different layers of the OSI model will affect what we expect to see from the protocol’s data:
Application: At the application layer, we are expecting to see actual user data. An example of a protocol that resides at this layer is HTTP. While looking at HTTP in packet analysis, we can see raw HTTP methods, such as GET or POST requests, then we can also see all the data that is returned by these methods. If we are analyzing an application layer protocol, we should expect very similar behavior.
Transport: This layer of the OSI model is used to provide host-to-host communication. At this layer resides protocols like TCP, which is used to provide reliable communication between hosts. It is capable of detecting and retransmitting missing packets as well as flow-control, ensuring packets are arriving at a rate at which the end device is still able to process the data and at a size that is suitable for the end host. If we were looking at a protocol at this layer, we would be dissecting the communication scheme used by two computers, and we would be looking at sockets and how the data will make it from host to host.
Network: The network layer is responsible for ensuring packets can make their way through multiple connected networks. IPv4 and IPv6 reside at this layer, both protocols having the role of providing an addressing and network mask scheme suitable for inter or intranet routing. Without layer 3, we would not be able to communicate outside of our local network. If we were looking at a layer 3 protocol, we’d likely be looking at some form of host and network masks. This would practically be the only data at this layer aside from some assorted flags. It is important to note, however, that without specialized equipment doing routing, it is impossible to implement a custom layer 3 protocol, as you need equipment capable of understanding the addressing scheme being used in order to route traffic. A normal IP router cannot route some arbitrarily addressed traffic.
Data-Link: The data link layer is going to define a way for communication within a local area network. This is an addressing scheme that does not need to worry about network masking, as it can only transmit within its own network. A protocol used at layer 2 is Ethernet which is used on most local area networks. This protocol uses a Media Access Control (MAC) address to give devices on a local area network an address to send traffic to in order to communicate with each other. If we were looking at a layer 2 protocol, we would see similar things to a layer 3 protocol without the network masking.
Physical: This layer defines the physical transmission of data. This would include things such as the framing of data (making sure we know where a layer 2 frame starts and stops), and translation of data from a digital signal within the equipment to an analog signal on the transmission medium, such as electrical for copper mediums or photonic on optical mediums. You will not analyze a layer 1 protocol, as they are not seen in a packet analysis software; however, it is important to keep in mind that this physical layer does exist, and it is very important.
Which protocols are beneath this protocol? This question is being asked to help us understand the full scope of the packet we are dissecting. When you are dissecting a custom network protocol, there are not any packet analysis tools that can identify it, that is until you write a dissector for it. So we are going to need to find some sort of pattern that can help us identify the traffic we are looking for. For example, if we are looking at a layer 7 protocol, we should be asking: What is this protocol using at the network layer (most likely TCP or UDP, which port is the protocol using)? Is this protocol using IPv4 or IPv6 (could we use these addresses to help identify the hosts using the custom protocol)? The layer 2 protocol is almost always going to be Ethernet and will not provide us a whole lot of information other than the hosts that are communicating using this protocol. The reason the hosts and port numbers will be important is in narrowing down our scope. If we are looking at a packet capture, there could be a lot of data, so the more we can zero in on our desired traffic the better. This will help us a lot when trying to figure out all the data that was transmitted over this protocol.
Which protocols are above this protocol? This will relate quite closely to the previous question, we are trying to narrow down our search. Although, if we are dealing with a protocol that is under layer 7, analysis will be much more difficult, as we will not be able to narrow down our search as easily. Most upper level protocols such as TCP and UDP, really only work with IP traffic. Therefore, if we are dealing with something like a custom layer 2 or 3 protocol, we might be dealing with a fully custom network stack. In this situation, we would likely be writing a full packet dissection tool to make our job easier.
Lab Setup⌗
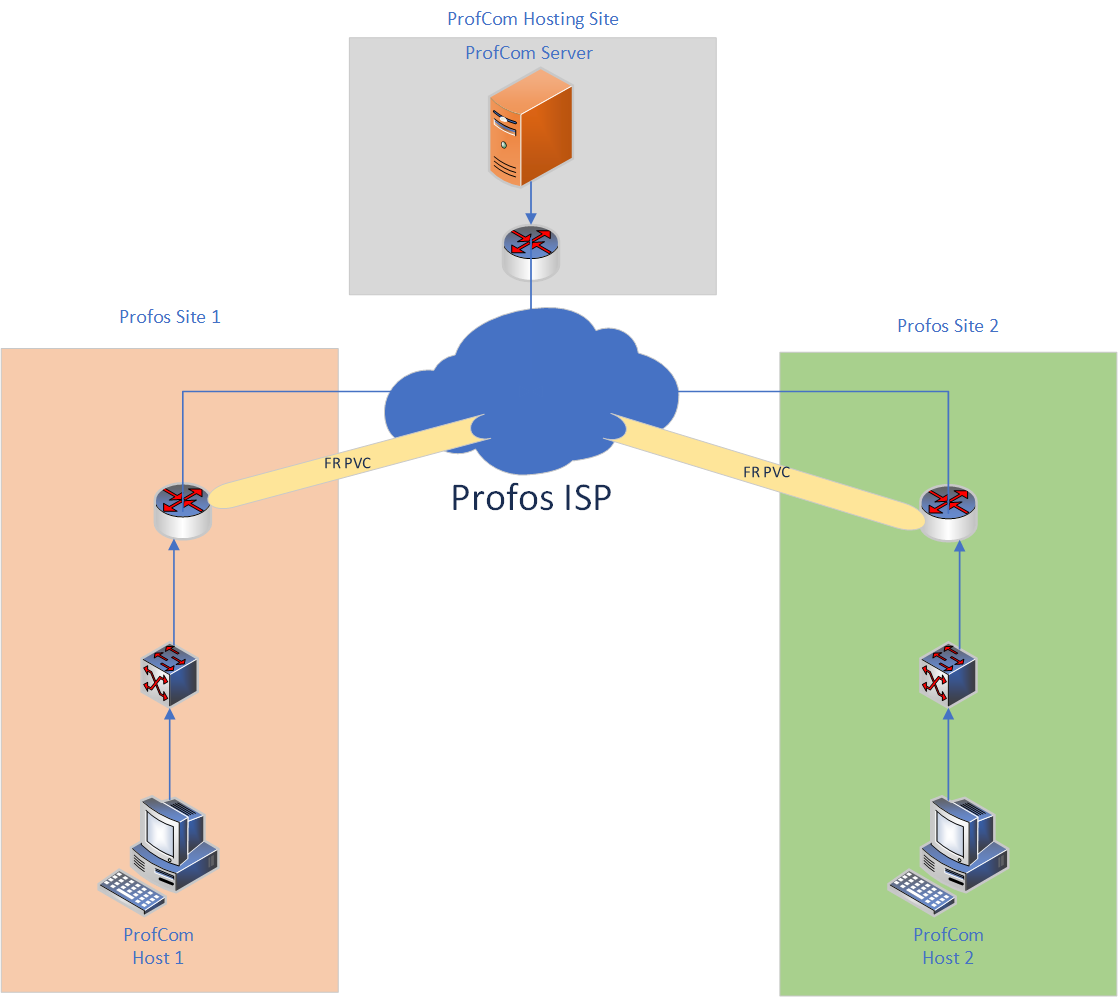
Machines: Two host machines (any Linux OS would work) running ProfCom Client, One server machine (any Linux OS would work) running ProfCom Server, Three routers (this setup emulates a main office, branch office, and the internet) all three configured to live in different subnets.
Tools: TCPDump, Wireshark, IDA
Lab Guide⌗
Preliminary Research⌗
Before we begin, we should read the protocol specification to answer the four questions we defined to begin this lab: Protocol Specification.
Endianess/Byte Order: According to our protocol specification, this data will be listed in Little-Endian format. There are a few ways we could have found this, albeit, without the help of the specification. Once we start to look at the data, we will notice all integers are listed without a bunch of preliminary zeros. The strings these integers are referencing are also not very large strings, so we can assume we are starting with our least significant bit, not the most significant bit. Little-endian will also read in a way that makes sense to read in English; although, if you’re used to reading binary, it might not make sense at first, as bits are read from most to least significant.
Which layer does the protocol reside at? Based on our protocol specification, we are likely dealing with an application layer protocol. The specification says it uses TCP port 8080, this would lead us to believe it will be above layer 4, we already know anything above layer 4 can safely be considered application layer when talking about packet analysis, especially seeing that we are not talking about an encryption protocol here.
Which layers are above and below the protocol? Seeing this is an application, we cannot have any layers above the protocol. We are told in the specification that we are using TCP as our layer 4 protocol. With this information, we can also assume that we are using an IP protocol, seeing that they are the only protocols that work well with TCP. We do not currently know for sure what our layer 2 protocol is, but we have a lot of information already.
One last thing we should keep in mind before looking at our packet capture is what data types we are working with and how big they are. This information is all referenced with the ProfCom Protocol Specification. We can see we will deal with Integers, Booleans, and Strings (Chars). The integers are listed as being 4 byte integers, a boolean is going to be a single byte, and the strings will be whichever size is specified by the integer listed prior to the string. All data will be listed in hexadecimal format. This is why a boolean is listed as a whole byte instead of a single bit; although, you could definitely list a boolean as a single bit.
Getting into the Analysis of the Protocol⌗
Obtaining the PCAP
We are going to be doing analysis of the Profcom.pcap file which should be in the /Some/Directory/Club-Challenges/Labs/Profcom/ directory as long as you have cloned this repository to your computer. If you have not, you can also download the file here Profcom.pcap.
Opening the File
Now that we have our PCAP, let’s open it in Wireshark. If you do not already have Wireshark installed here is a link to the installers for Windows. To install, just download the installer for your system, and follow the instructions in the installer. To install Wireshark in a Debian based distribution such as Kali or Ubuntu, run the following commands:
# Update your repository listings
$ sudo apt update

# Install Wireshark
$ sudo apt install wireshark
If you are installing wireshark on another distribution that is not debian based, attempt to install Wireshark with your distributions package manager. If you are needing assistance the Wireshark Website has a lot of documentation to assist you.
Let’s open Wireshark:
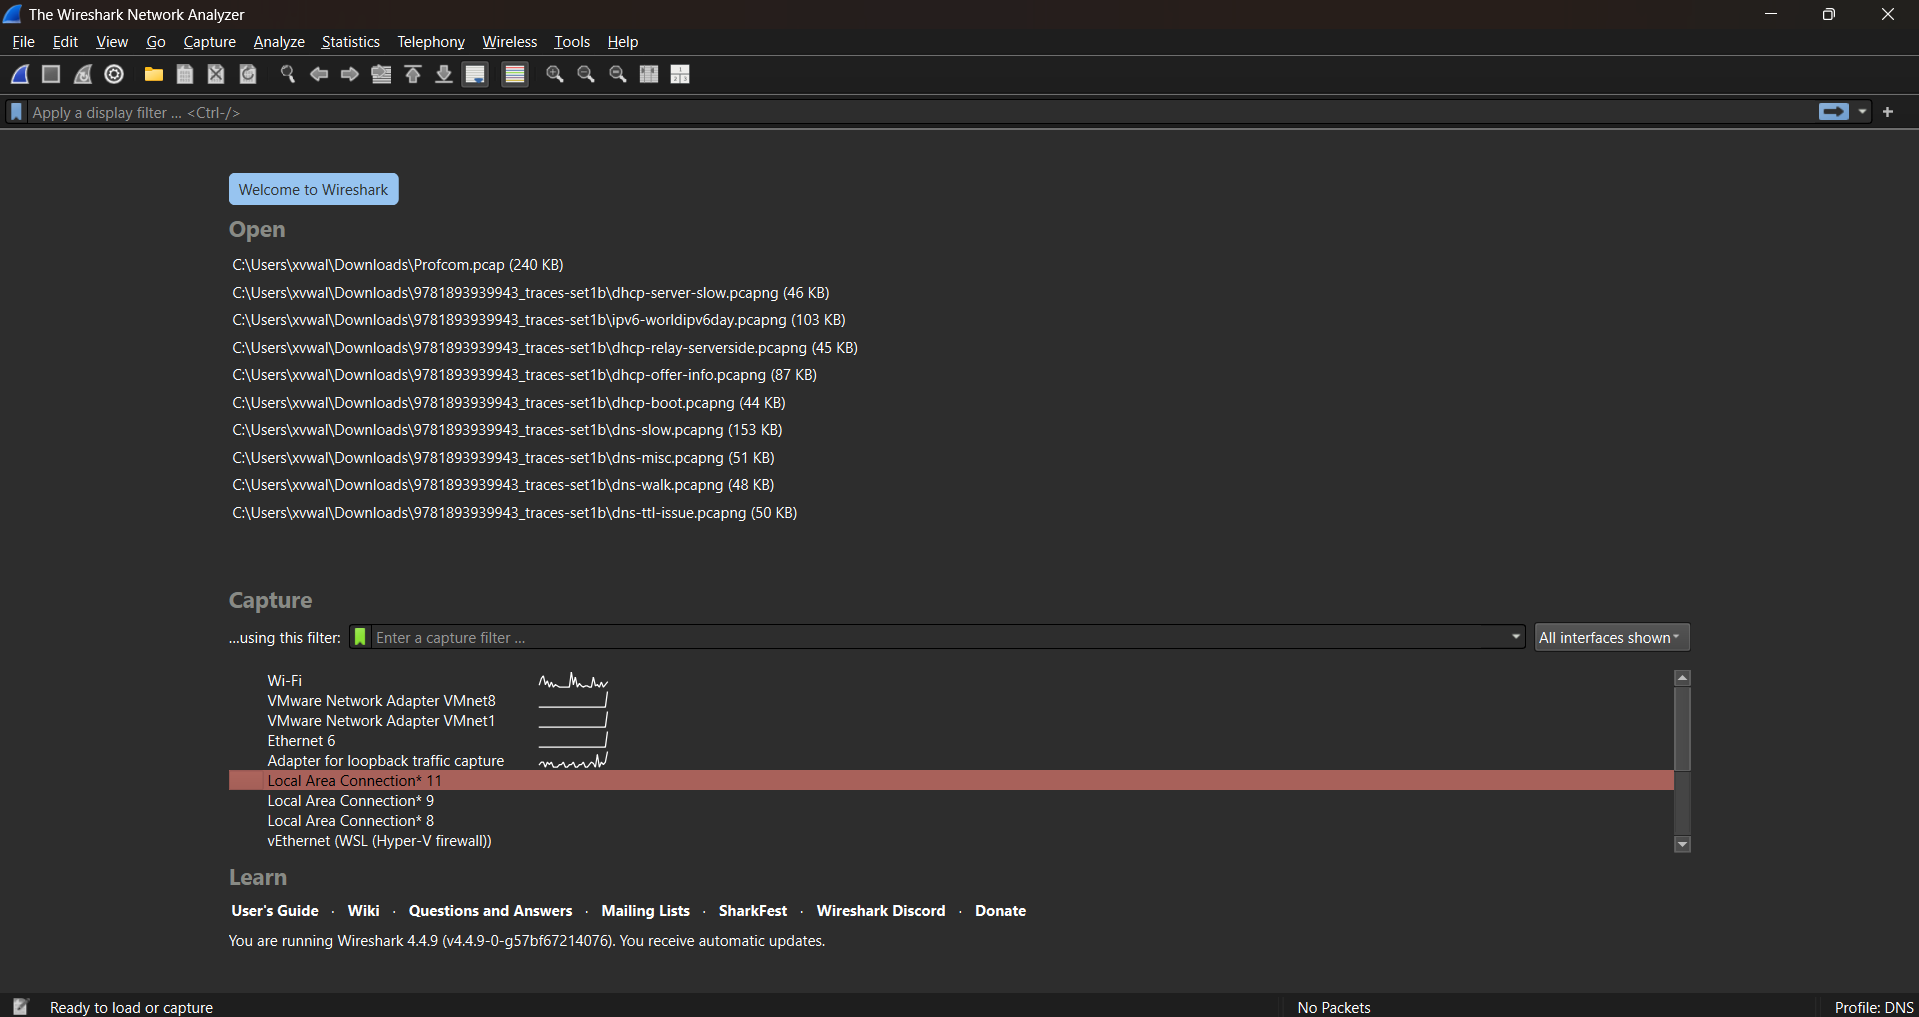
We are going to go to File > Open, and navigate to where your Profcom.pcap file has been stored.
This is what we should see when we first open our file it can seem like a lot to analyze, but we are going to narrow it down a bit to make it easier.
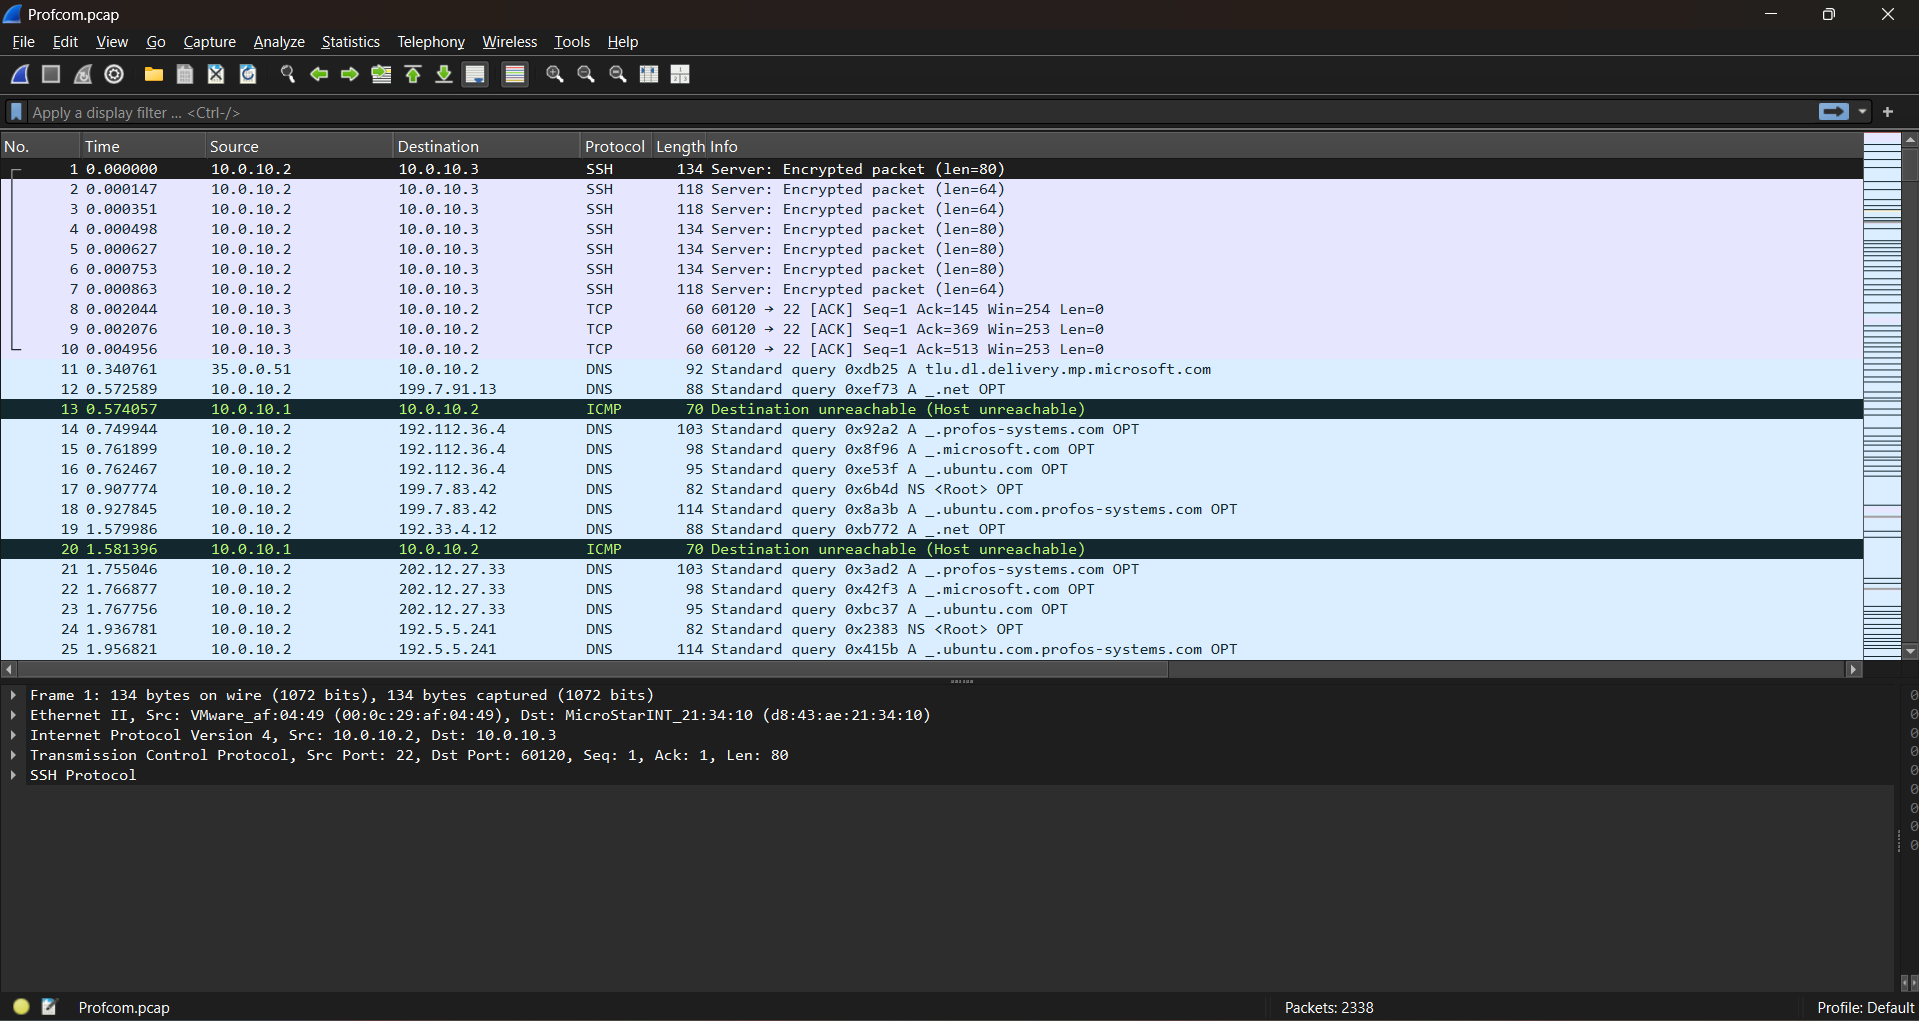
Let’s add our first filter: According to our protocol specification, we are dealing with a TCP based protocol operating on port 8080. Now, in some situations, we might end up with HTTP traffic mixed in with the traffic we are looking for. This is because sometimes people will use 8080 for a web server. We will not need to contend with this issue in our situation. The syntax of this filter will be:
tcp.port == 8080
After applying this filter, we are seeing a big change in the amount of traffic we have to deal with. If we look in the bottom right of the screen, we can see the answer to our first question, we see the total packets in the file listed as 2338, while we are currently displaying 78 packets. This is because we have filtered to only see traffic running on port 8080, as stated previously this would be all our ProfCom packets.

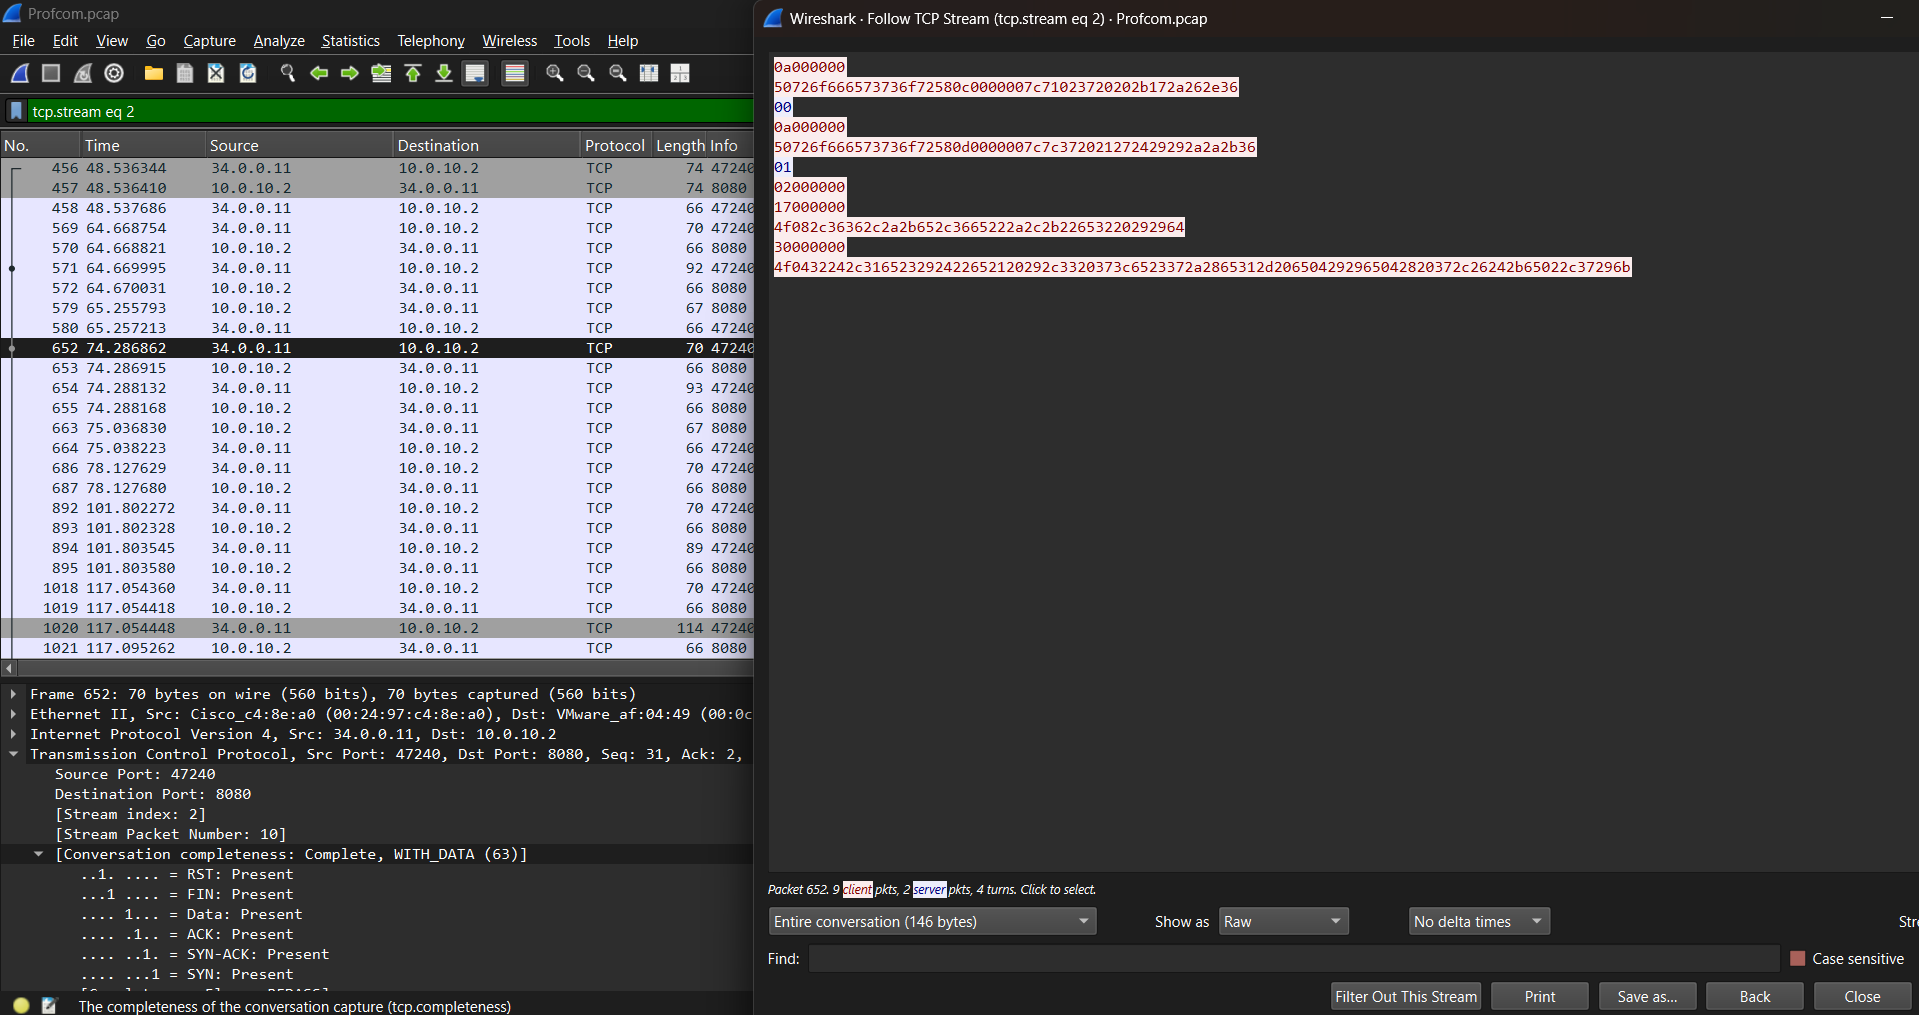
To make this analysis as easy as possible for us, we are going to break this analysis up into the individual TCP streams (a conversation over TCP). Doing this in Wireshark, we will see all of our data from a given stream all in one window. To do this we will click the first packet–in the top bar we will go to Analyze > Follow > TCP Stream. The result of this operation should give you the following window:
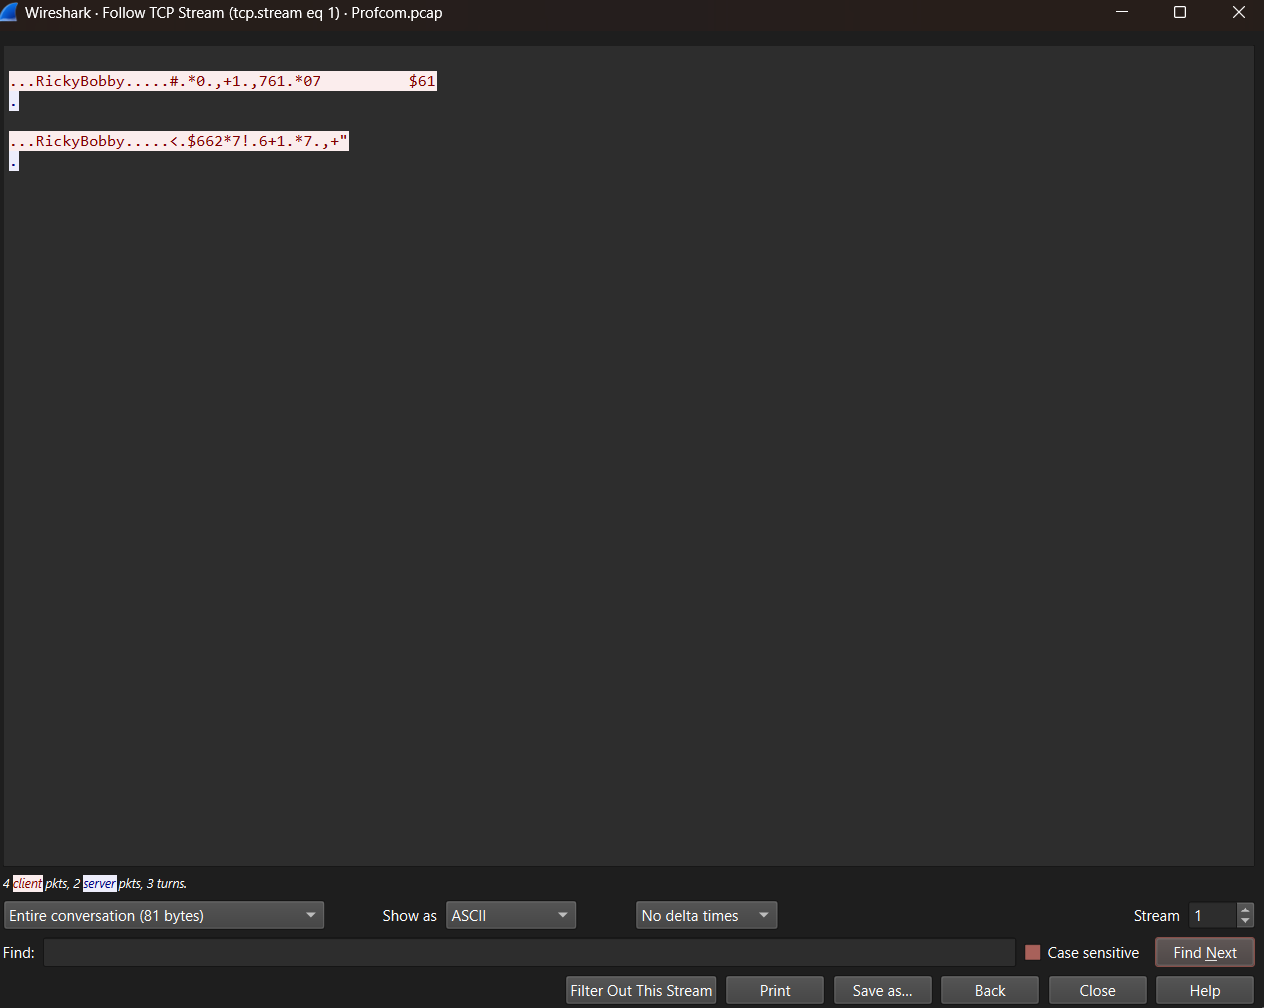
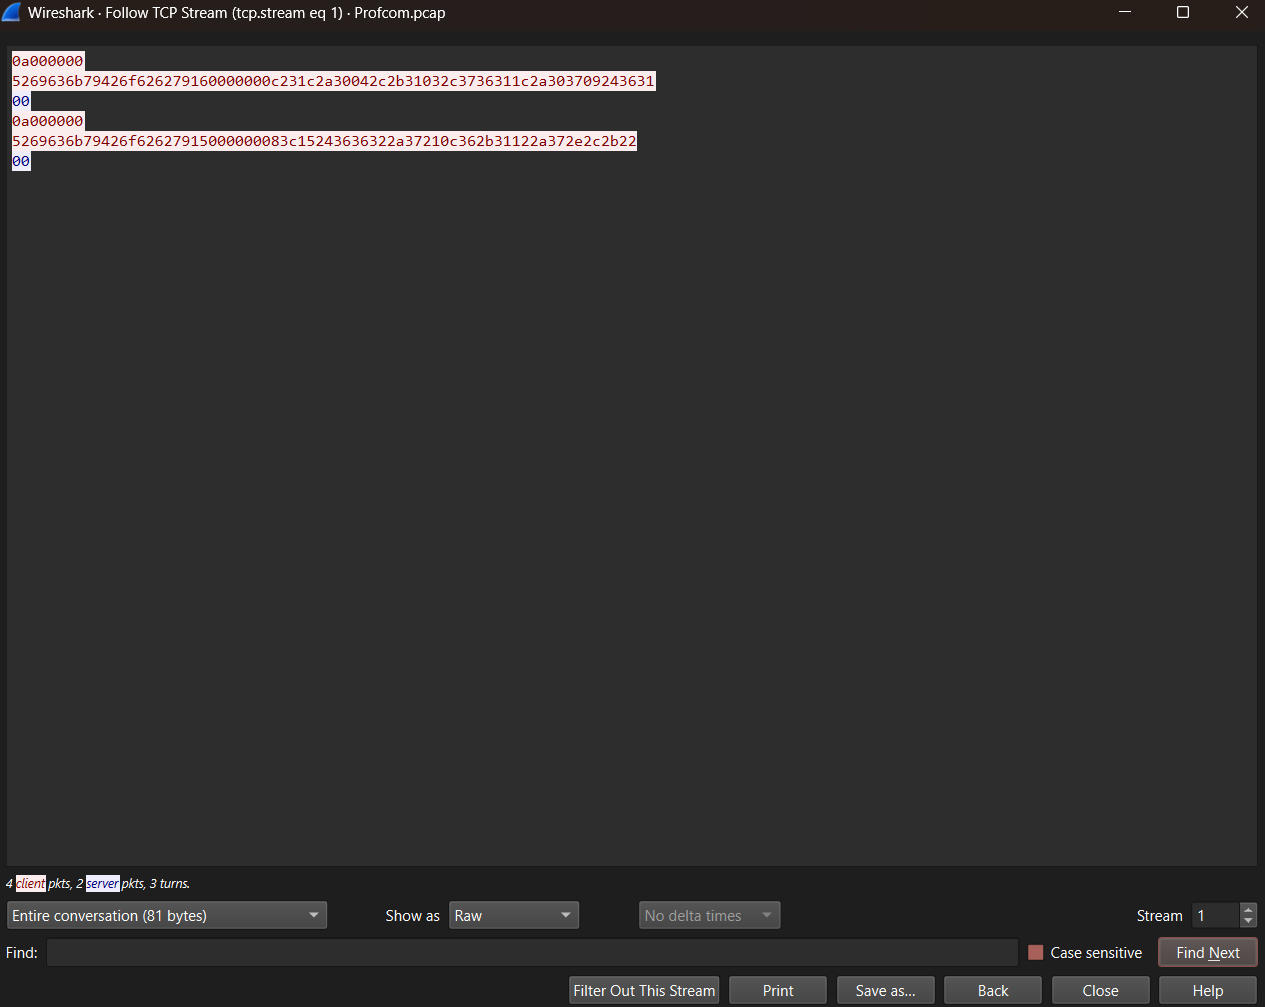
One last thing we want to do before analyzing this file is change which format is being displayed. Right now, Wireshark is showing us an ASCII representation, which is great, when all of our data is human readable. However, in this case, it is not! We are going to change from ASCII to RAW. In order to do this, we will go to the “Show As” list, and change from ASCII to RAW. This will show all of our data as raw hexadecimal bytes.
Analyzing RAW Packets
Now that we are viewing our first TCP conversation, let’s attempt some analysis. Our protocol specification stated that the very first bit of data should be the following:
Client -> Server

    Login Process:

        Integer Length of Username
        Char Username
        Integer Length of Password
        Char Password
Another nice aspect of Wireshark is its ability to colorize these conversations for us. The key states that everything colored red is the client, everything colored blue is the server. We are starting with the client sending to the server, so we are looking for our first red segment of bytes. This segment would be:
0a000000
5269636b79426f626279160000000c231c2a30042c2b31032c3736311c2a303709243631
Let’s break this down piece by piece, starting with our first portion of the conversation, an integer that will show the length of the username. An integer is 4 bytes, and we haven’t looked at any bytes yet so we’ll start at offset 0 (or 0 bytes from the start of the file). Now, remember, one hexadecimal character is 4 bits; therefore, we need two to represent a byte, so really, we’re grabbing the first 8 characters here:
0a000000
Remembering that this is in little-endian format, we are looking at the hexadecimal representation of the decimal number 10. This means the next 10 bytes are the username. So, if we do a little math, we could say:
Seek to next offset = Initial Offset (0) + Length of Current Piece of Data (Integer = 4) + Length of next piece of data (10)
We know we have currently read up to offset 4, because we went from offset 0 and read 4 bytes. Based on our math, we need to read to offset 14. Everything between offset 4 and 14 is our data.
Offset 0 | 0a000000 | Offset 4 | 5269636b79426f626279 | Offset 14 |
Now that we know the segment of data we are dealing with, we can convert this hexadecimal to readable text. We are dealing with characters, so we do not need to worry about endianness. We are just converting each byte to its corresponding ASCII character. One of the easiest ways to do this is using cyberchef.org. If you follow the previous link, you will be brought to their page. We are going to look for a way to convert from hexadecimal to ASCII. By default, all the conversions from functions just convert whatever the input data type is to human-readable ASCII form, so in the search bar, let’s lookup hex.
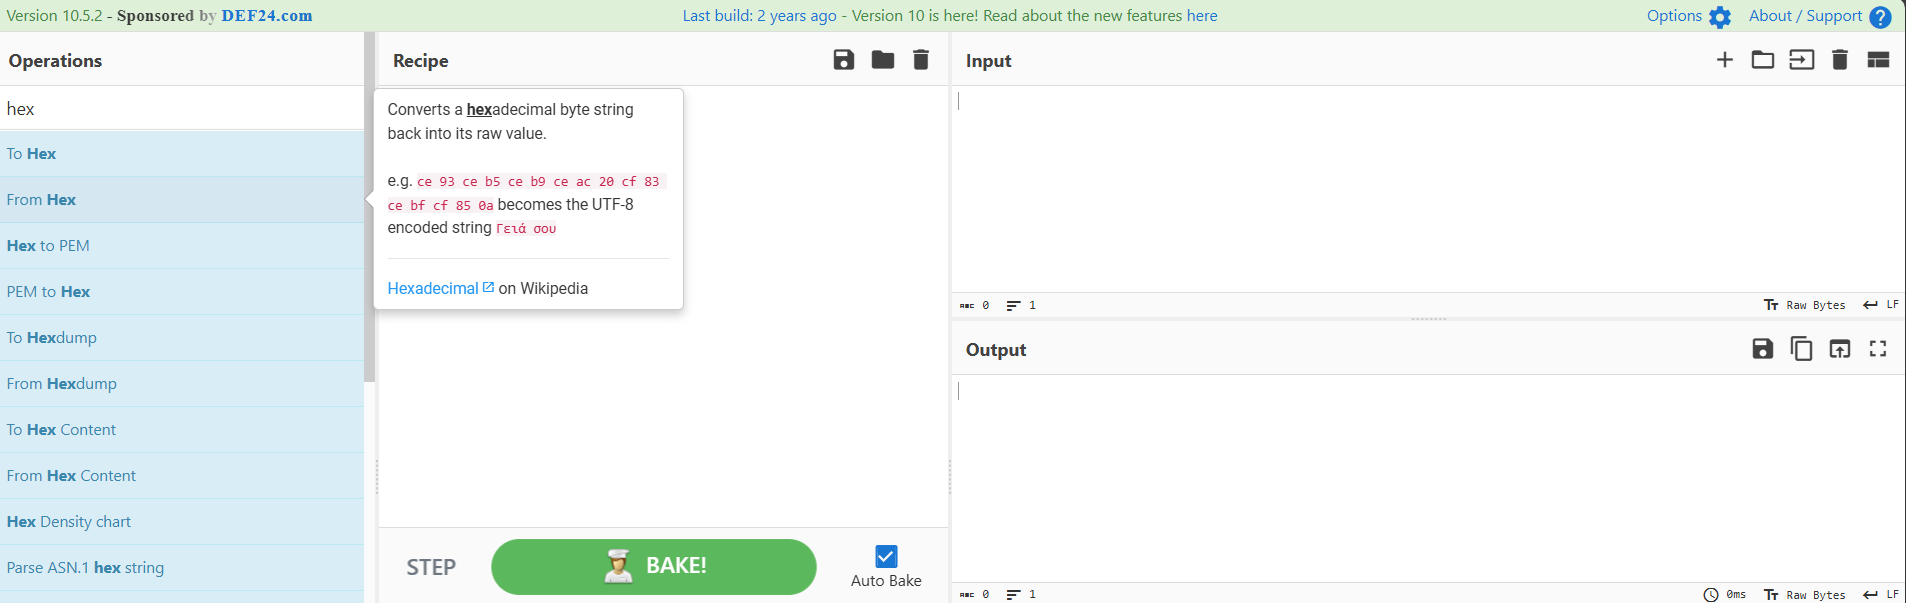
Double click “From Hex” and it should be added to your recipe.
Now that we have a recipe created, we can add our hexadecimal text into the input box, and we should be given an output that is clear, human-readable text.
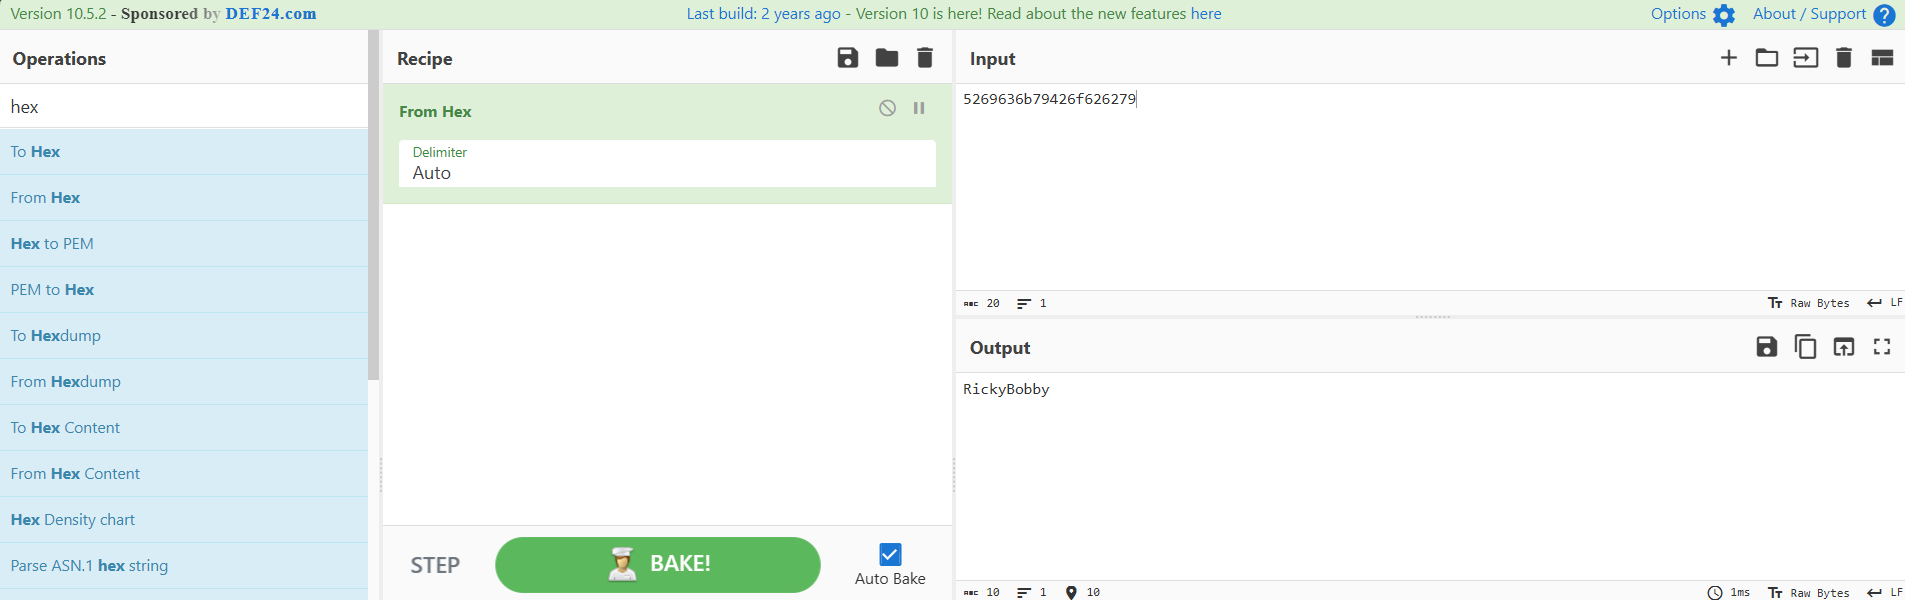
We see, based on this conversion, our first username that was sent is RickyBobby.
Our last piece of data went to offset 14, and based on our specification, we are reading an integer now, so we will read from offset 14 + 4 bytes ending at offset 18:
Offset 0 | 0a000000 | Offset 4 | 5269636b79426f626279 | Offset 14 | 16000000 | Offset 18 |
We see this is hexadecimal number 16. Now, remember, this is hexadecimal not decimal. In binary this would be 00010110, meaning we have a one in the 2s, 4s, and 16s place. Adding these values together, we get 22. Using our equation from earlier, we are seeking from offset 18 to 40. According to the specification, this will be our user’s password.
Offset 0 | 0a000000 | Offset 4 | 5269636b79426f626279 | Offset 14 | 16000000
| Offset 18 | 0c231c2a30042c2b31032c3736311c2a303709243631 | Offset 40 |
Plugging this into the previously used “From Hex” function, we are going to see something strange–our data seems to have been corrupted!

We need to remember the protocol specification references an XOR key that was used to “encrypt the data”. If you would like to learn more about XORs, here is a link to read more about them. I will not cover them in this lab, as this is more of a lab on protocols not ciphering. The XOR that was given to us is the key 0x45, which means the binary we are doing an XOR operation over is 0100 0101. The decryption process would look like this:
Take the first byte of the password and convert it to binary:
0C = 0000 1100

Put the mask (key) above the byte we are converting:
0100 0101
0000 1100

Complete an "Exclusive OR" operation on the byte
(if the bit on top is 1 and the bottom is 0 (different), return 1)
(if the bit on top is 0 and the bottom is 1 (different), return 1)
(if the bit on both the top and bottom is 1 or 0 (the same), return 0)
0100 0101
0000 1100
0100 1001

Convert back to hex
0100 1001 = 49

Convert from hex to ASCII

0x49 = I
This is a very tough operation to do by hand for 22 different bytes, so thankfully, we can use Cyberchef to do this operation.
We are going to create a recipe to undo this XOR cipher. We already have something like a pseudocode representation above. Thankfully, a lot of these conversions are unneeded in Cyberchef. We are only going to need to go “From Hex” and do an “XOR” operation using hex key value 45.
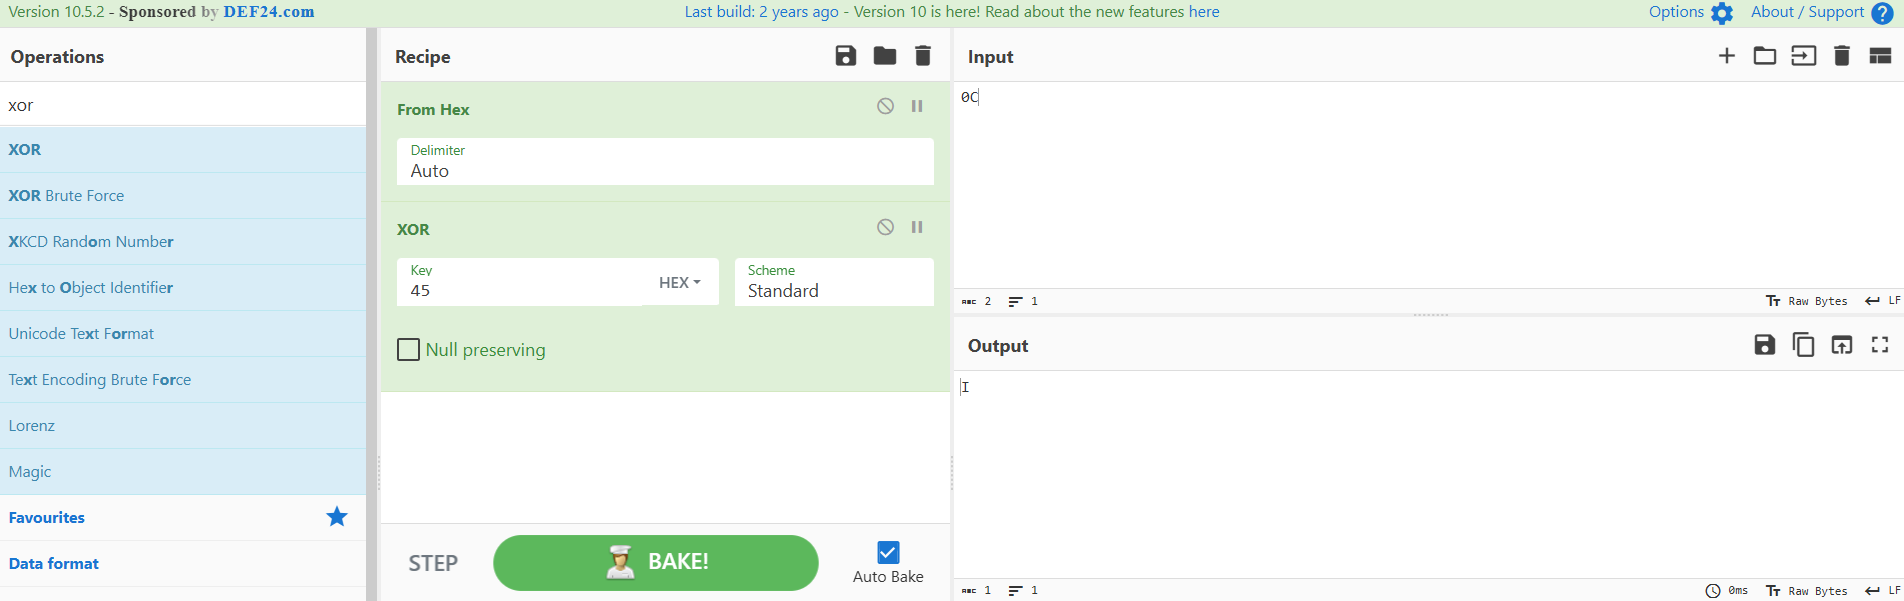
Now that we have our recipe built, we can plug in our entire password from the PCAP, and we should get our plaintext password.
0c231c2a30042c2b31032c3736311c2a303709243631 = IfYouAintFirstYourLast
Hopefully this shows you why using an XOR cipher is just a trivial form of protection. If this was a production protocol, we should be using something like TLS to protect something as sensitive as an authentication process!
Moving on in our analysis, we see our first server message, which during authentication, should just be a one byte boolean (either 01 for true or 00 for false), stating if we have successfully logged in. This would be from offset 40 to 41.
Offset 0 | 0a000000 | Offset 4 | 5269636b79426f626279 | Offset 14 | 16000000 | Offset 18 |
0c231c2a30042c2b31032c3736311c2a303709243631 | Offset 40 | 00 | Offset 41 |
We see 00 here, meaning the client did not successfully authenticate. Therefore, the client should be attempting another authentication after this. We do see more traffic, so obviously, the client is going to try again.
Please begin attempting to solve the rest of the analysis for this TCP stream. The results of the analysis are below this message:
Username Length: 10

Username: RickyBobby

Password Length: 21

Password: MyPasswordIsntWorking
We see that the server responds with 00 at the end of this authentication, and then the client disconnects, meaning this is not one of our successfully authenticated users.
In the bottom right corner, we will click the up arrow next to the stream number, and go to TCP stream number 2:

Looking at Stream 2 we already have a very promising sign–we can see the server has responded with a 01, meaning there is a successful authentication within this stream. We can already see that this will be in the second authentication attempt. However, we can analyze attempt number one for some extra practice:
Username Length: 10

Username: ProfessorX

Password Length: 12

Password: 94GreenRocks
The response from the server on this attempt is 00, meaning this was unsuccessful. However, whatever is transmitted next seems to be a success. Let’s do this analysis and see what the successful credentials are.
Username Length: 10

Username: ProfessorX

Password Length: 13

Password: 99redballoons
This tells us the first user to sign in is ProfessorX with a password of 99redballoons. Now that you have dissected the authentication of two different TCP streams, hopefully you are now fully aware of the dangers of XOR ciphers but more importantly the dangers of believing in security through obscurity.
We can now see a portion of the protocol flow we have not seen yet. The client has successfully authenticated and is now on to the communication portion of this protocol. The client is preparing to send some messages. Here is a reminder of what the packets will look like for data transfer:
Client -> Server

    Integer Number of Messages to Send

Client -> Server

    Integer Length of Message
    Char Data
With this new model in mind, we are going to dissect these packets in the same way that we did earlier. We are going to find our offsets, seek from offset to offset till we have all our segments pulled out, then we will analyze the data within these segments.
The very first message is just one integer being sent from client to server. This is on its own line in Wireshark, but it is from offset 63 to 67.
| Offset 63 | 02000000 | Offset 67 |
02, in hexadecimal, represents 2 in decimal, so we are going to be expecting 2 messages to be transmitted following that transmission. The next piece of data we will be looking at starts on the line below this or Offset 67. We are looking at an integer, so we know we will read the next 4 bytes. So, from the end of the 67th byte, we will read 4 bytes bringing us to the 71st byte in the stream.
| Offset 63 | 02000000 | Offset 67 | 17000000 | Offset 71 |
The data at this position is 17 which converts to 23 in decimal. Now we know our first message will be 23 bytes in length.
Let’s look at our offsets, and find what data we are dealing with at this point. We know we ended at Offset 71, so we are going to look 23 bytes from byte 71 giving us offset 94:
| Offset 63 | 02000000 | Offset 67 | 17000000 | Offset 71 |
4f082c36362c2a2b652c3665222a2c2b22653220292964 | Offset 94 |
The segment we are working with now is 4f082c36362c2a2b652c3665222a2c2b22653220292964. If we try to change this from hex to ASCII, we will run into the same corrupted look that we ran into earlier trying to look at a password. So, remember to run this through and XOR operation in order to get the plain text message from ProfessorX. After decoding the message we get:
Mission is going well!
According to our file specification, and the fact we are supposed to be receiving two messages in this transmission, we know we should be expecting an integer next–this would be between offsets 94 and 98.
| Offset 63 | 02000000 | Offset 67 | 17000000 | Offset 71 |
4f082c36362c2a2b652c3665222a2c2b22653220292964 | Offset 94 | 30000000
| Offset 98 |
30, in decimal, is 48, meaning we are going to read the next and final 48 bytes, all the way to offset 146 of this stream. Then, we will XOR decode the final message from ProfessorX.
| Offset 63 | 02000000 | Offset 67 | 17000000 | Offset 71 |
4f082c36362c2a2b652c3665222a2c2b22653220292964 | Offset 94 |
30000000 | Offset 98 | 4f0432242c316523292422652120292c3320373c6523372a2865312d206504292965042820372c26242b65022c37296b
| Offset 146 |
After decoding the message, we can see that ProfessorX sent this to the server:
Await flag delivery from the All American Girl.
In this case we must be looking for another user that has something to do with the name “All American Girl”. She should be sending a flag, which sounds like very useful information.
Let’s move on to Stream 3, hopefully this stream will net us some useful information.
Clicking into stream 3 using the same TCP stream selector, we see this stream will also include a successful authentication. It also seems to only have one authentication. We do not have any unnecessary analysis to do here; we will need to dissect everything in this stream.
We should begin by finding who our user is and what their password is. We have done this many times, so I will just leave the answers under this message. Remember for further practice, please still attempt to dissect this stream in its entirety.
Username Length: 15

Username: AllAmericanGirl

Password Length: 7

Password: Vein.fm
Now, looking to the data transfer section of this file, we see we will be sending two messages again, shown by the next integer that is sent:
02000000
This is followed by the length of the first message which is:
Hex = 27000000

Decimal = 39
Then the first message which is:
Hex = 4f04292965042820372c26242b65022c3729652d2436652a2731242c2b20216524652329242264

ASCII = All American Girl has obtained a flag!
Now we have one last integer to look at which is:
Hex = 0e000000

Decimal = 14
This is followed by a final message from All American Girl, which is the flag. If you have followed along, this will be your knowledge check to ensure you have grasped this topic. I will only share this answer in the answers files of this lab. Please attempt to decrypt the flag before viewing the answer!
If you would like an extra practice problem you can attempt stream 4; although, this is an unsuccessful login attempt.
Username Length: 13

Username: FredFlinstone

Password Length: 16

Password: YabbaDabbaDooooo
Getting Additional Information
While it is always nice to have all of this data about these users, we should really try to narrow down where this data is coming from. At the very least we could get a MAC address, or an IP address, that could tell us a little more about these users.
Let’s start by looking at our first successful authentication–this is for the ProfessorX user. This is going to be under TCP stream 2. While inside of the “Follow TCP stream” window, let’s click on any of the data shown in red. You might be able to see Wireshark will actually jump to wherever that traffic is actually sent within the packet capture. Within the successful login section of this stream, I clicked on the 0a000000 section, and it took me to frame 652.
Let’s do a deeper dive into this file to hopefully extract some information. We should keep in mind that we are looking at the client traffic right now, meaning the source addresses will be from the client, and the destination addresses will be for the server. If we had clicked the server or blue traffic, we would see source addresses that would belong to the server and destination addresses that belong to the clients. We can close the “Follow TCP Stream” window and make the window on the bottom of the screen larger. We will not dig too deep into these layers right now. But it is important to note, these are in order of how they appear in the OSI model. Feel free to play around with these layers on your own–try to see what all the fields are for each layer. We are going to take a closer look at this window on the bottom of the screen:

We can see all our addressing information here–you can either just look at these layers as they appear already, or you can expand them to see the values displayed differently. However, for this example, I will not be expanding these layers. We can see at layer 2, we have two MAC addresses: we have a source (the client) 00:24:97:c4:8e:a0 and a destination (the server) 00:0c:29:af:04:49. Moving up to layer 3, we have our IP addresses, we have a source (the client) 34.0.0.11, and a destination (the server) 10.0.10.2. Finally, we will move to layer 4 here we aren’t dealing with addresses but ports: our source port (the client) 47240 and a destination port (the server) 8080.
If we do this same process for the authentication that comes from the All American Girl, we find the following:
Source MAC Address: 00:24:97:c4:8e:a0
Destination MAC Address: 00:0c:29:af:04:49

Source IP Address: 35.0.0.53
Destination IP Address: 10.0.10.2

Source Port: 42614
Destination Port: 8080
Questions:⌗
Question 1:
How many ProfCom Packets were sent in this packet capture?
Question 2:
What are the usernames of the users who successfully log in?
Question 3:
What password is used to successfully authenticate the 2nd user?
Question 4:
What IP address did the 1st user successfully authenticate from?
Question 5:
What is the IP address of the server?
Question 6:
How many messages were sent by the 2nd user that successfully authenticated?
Question 7:
What is the flag that was transferred by the protocol?
Question 8:
Where was this capture completed based on the diagram?
Answers⌗
The answers to the questions asked within this lab are contained within the Profos-Systems Communications Lab Answer File.
Conclusion⌗
Throughout this lab, you have hopefully learned many new things in the world of packet analysis, more specifically dissecting a custom networking protocol. In all, you have learned how to read a protocol specification. While this one is quite simple, you now have the foundation to read any kind of protocol specification. You have also learned what the different layers of the OSI model are, what they do, and how they work together to provide end-to-end communication. You touched on file offsets, both how to use them to segment data for analysis, and how to find an offset. We looked into the concept of security through obscurity, seeing first-hand why this is such an inadequate security measure. Finally, you got to use Wireshark’s built-in analysis tools to find information such as source and destination address, from layer 2 up to layer 4. Hopefully this has been a very informative lab for you. If you would like an extra challenge, attempt to reverse engineer the ProfComClient file that is within this directory. Try to find the XOR key that is used for encryption, or try to find the actual IP address that the clients used to access the ProfComServer. If you would like to learn more about protocol analysis Wireshark has many resources, all of which teach you very valuable lessons in packet analysis.
Until Next Time!
The Professor